Accuracy and performance in precision engineering
In precision engineering, the performance of a machine or instrument is typically expressed in terms of the accuracy of that machine or instrument’s “output”, such as:
- The deviation of machined surfaces from theoretically perfect form
- The deviation of measurements of those surfaces from actual form
- An actual movement versus a commanded movement
- The angular deviation of an optical axis from the theoretically perfectly aligned axis
This top level performance is typically the function of an arrangement of subcomponents, each with its own accuracy, contributing directly or indirectly to the performance of the whole; interactions between those components; and interactions with the environment.
To design a successful precision machine or instrument, you must understand:
- Accuracy and the related characteristics of repeatability and resolution
- The limiting relationship between accuracy and repeatability
- The contribution of the subcomponents and the environment on the accuracy of the system as a whole.
Basic definitions and relationships
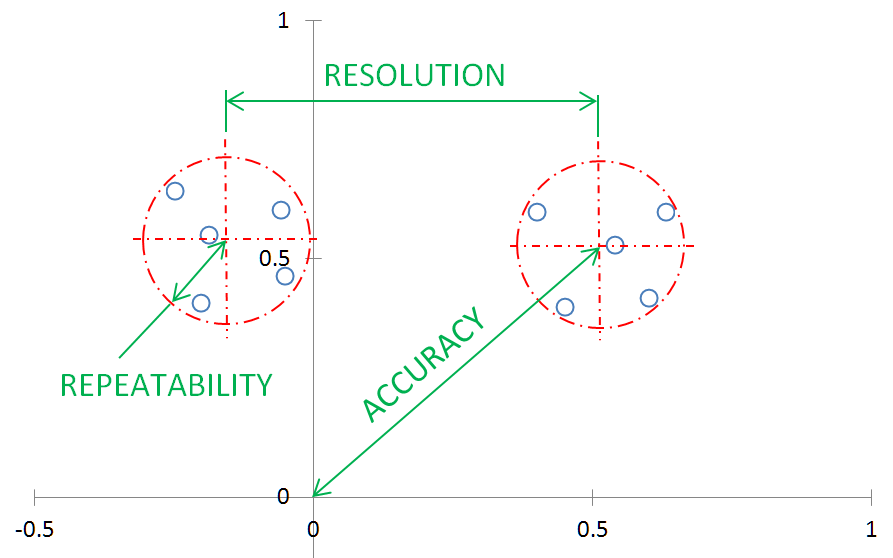
The figure above is a graphical representation of accuracy, repeatability, and resolution in the case of a position that is either measured or moved to. The origin represents the true position to be measured or moved to. The small circles represent the actual positions measured or moved to. The dashed circles enclose a set of results for a series of attempts made under the same conditions, e.g., movement from the same direction.
- Accuracy is the maximum deviation from the ideal outcome (e.g., moving to an exact position, exactly measuring a quantity, or bonding a stack of pre-aligned wafers without disturbing the alignment) and the actual outcome.
- Repeatability is the variation in the result over many attempts to produce the same outcome, such as moving to the same position, taking the same measurement, or bonding successive stacks of wafers under the same conditions.
- Resolution is the smallest increment of measurement, movement, or other output that the machine or component is capable of. Post-bond alignment accuracy is an example of a context in which resolution has no direct meaning.
The limiting relationship between accuracy and repeatability
Although accuracy is typically “what the customer pays for,” it is important to know and understand the repeatability of the components and the system as a whole, because repeatability is the lower limit of accuracy.
The following graphs demonstrate this limiting relationship.
In the figure, the points represent repeated attempts to move to the origin.
Low Accuracy, Low Repeatability – In the first graph, the results are scattered far and wide about the origin. Both the accuracy and the repeatability are low.
Low Accuracy, High Repeatability – In the second graph, the results are tightly grouped but far from the origin. The repeatability is high, but the accuracy is low. However, when an outcome is this repeatable, it is possible to deduce the causes of errors and correct or compensate for them.
High Accuracy, High Repeatability – This process of compensation or correction often leads to graph that looks like the third: High accuracy and high repeatability.
Once the results are clustered around the true position like this, the only way to improve accuracy is to improve repeatability. Therefore, repeatability is the lower limit of accuracy.
Repeatability
Repeatability is the variation in the result over many attempts to produce the same outcome, such as moving to the same position, taking the same measurement, or bonding successive stacks of wafers under the same conditions.
Repeatable, inaccurate systems often suffer from systematic errors. Accuracy can be improved by:
- Adjustment, calibration
- Mapping & compensating for errors using the control system. Such errors could include backlash and variation in screw pitch along the length of travel.
Low repeatability is often a sign of environmental factors such as heat causing differential thermal expansion, strain relief, and reset. So environmental control can be a critical part of developing a precision machine or instrument.
Theoretical and operational resolution
Resolution is the smallest increment of measurement, movement, or other output that a machine or component is capable of.
The resolution of a positioning system is the smallest change that can be commanded and carried out with the desired result.
The resolution of a measuring system, such as a CMM, is the smallest change in the measured quantity that can be detected.
A machine typically has a theoretical resolution that is finer than its operational resolution. In theory, a certain combination of stepper, gear box, and lead screw may be able to move in 1 nm increments in response to a motor controller input. But stiction (static friction), backlash, hysteresis, and other nonlinear effects might prevent a movement of less than 20 nm from a static start.
The operational resolution, also known as the minimum incremental motion, is the smallest movement that can be consistently and reliably performed for a given input.
When specifying or characterizing a positioning system, as part of design or troubleshooting, it is important to know and understand both the theoretical and operational resolution. Vendors do not typically publish operational resolution for components. Even if they do, it is likely to be highly dependent on your particular application. So simulation; early prototyping and test; and characterization of the complete system are critical tools for designing a precision machine that will perform as desired.


